AirTags on Android, sorta
The easiest way to set up and track AirTags from your Android phone is to not, and instead to buy a used iOS device, and use that when you need to check your AirTags.
However, if you make a Mac stay powered on and take screenshots forever, you can use those to track AirTags from your Android phone (or from the web, or your Windows PC, or wherever).
(You'll still need an iOS device to set them up, though.)
- Example
- Background
- Necessary iOS devices
- Necessary accounts
- Necessary macOS devices
- Setting up the Mac to stay on forever
- Taking screenshots of Find My using Shortcuts
- Triggering the Shortcut every 15 minutes
- The web site
- The competition
- Further notes on using just an iOS device
- Irregularites when adding additional AirTags
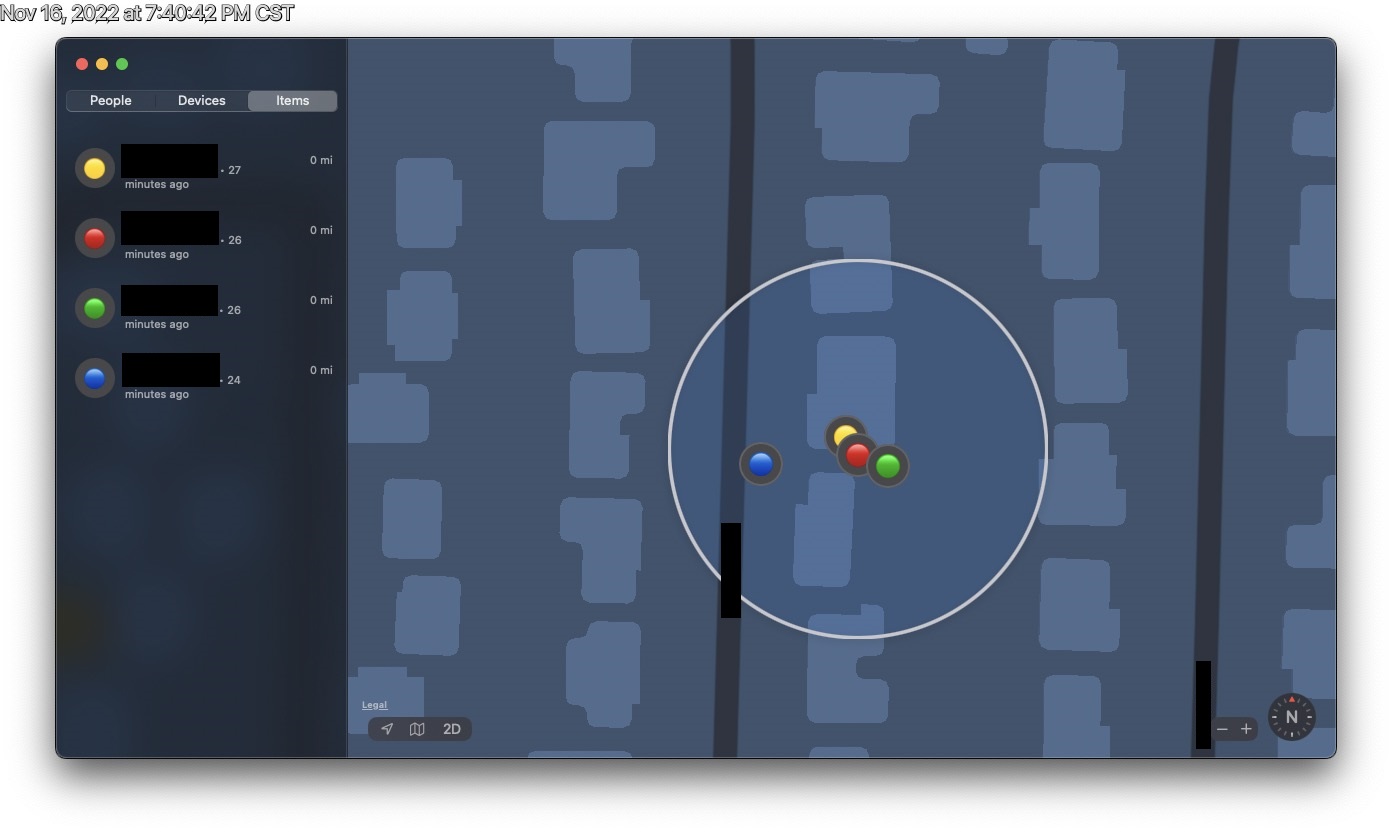
Example
Background
Every recent iOS and macOS device looks out for Find My-compatible devices and relays their location to Apple, giving the Find My network incomparable reach and distribution. There's no Android or Windows equivalent, and those markets are so fragmented there may not be able to be.
We have family members doing some international travel, and we thought AirTags would be helpful, but those family members are all Android- and Windows-users. Asking them to carry around one or more extra phones (and all the risk loose devices entail when traveling) just for AirTags seemed like a lot.
Instead, we bought a used iOS device, registered a new Apple ID, registered AirTags with it, and then set up a disused Mac Mini to take screenshots of the Find My application and put them online every 15 minutes.
Necessary iOS devices
AirTags can only be set up with an iPhone 6S, SE, or later; or an iPad 5th+, iPad Air 2+ iPad mini 4+, iPad Pro, or the most recent (discontinued) iPod Touch.
A device in this category should be available around USD $100; I picked up an iPhone 7 for $80 off Craigslist. Recent sales on deal site Woot! had a refurbished iPhone SE for $139.99 and a refurbished iPad 5 for $129.99.
The device should be completely removed from other Apple IDs (signed out of iCloud, iTunes, and the App Store, no device or Restrictions passcodes, removed from trusted devices) before being used in this way. It doesn't need a SIM card, so a blocked IMEI or carrier-locked phone should be okay to use, but it can't be activation locked. It does need working Bluetooth and wifi, and an internet connection.
Necessary accounts
AirTags are tied to an Apple ID, with a limit of 16 AirTags per ID.
Apple IDs are tied to email addresses. Creating a new one also requires a phone number that can either receive a phone call or receive a text message from a shortcode (which means a SMS-only VoIP number doesn't work).
Creating a new Apple ID from the web doesn't give you the option to create a new iCloud email address to go with it. Setting it up from the iPhone does, so that's what we did. We then used that iCloud Apple ID to set up the Mac Mini for the first time.
Necessary macOS devices
You need a Mac running macOS 11+ (Big Sur). (macOS 10.15 Catalina supports "Find My" Devices and People, but not Items.) Tools like OpenCore Legacy Patcher add support for even older devices than the ~2013+ requirements for Big Sur, or the ~2015+ requirements for Monterey. We're using OpenCore Legacy Patcher to run Monterey on a disused 2012 Mac Mini.
A device in this category should be available around USD $150. My local Craigslist currently has five (5) systems which are supported by OpenCore Legacy Patcher for $100 or less. A recent sale on Woot! had an iMac for $169.99+.
Setting up the Mac to stay on forever
Once you've got your iOS and macOS device running, and you've added AirTags to your Apple ID, let's set the Mac to be always on. In System Preferences:
- Users & Groups ➡ Login Options ➡ Automatic login: username
- Security & Privacy ➡ General ➡ Uncheck "Require password after sleep or screen saver begins"
- Desktop & Screen Saver ➡ Screen Saver ➡ Uncheck "Show screen saver after"
- Energy Saver ➡ Power ➡ Turn display off after: Never
- Energy Saver ➡ Power ➡ Check "Prevent your Mac from automatically sleeping with the display is off"
- Bluetooth ➡ Advanced ➡ Uncheck "Open Bluetooth Setup Assistant at startup if no keyboard is detected"
- Bluetooth ➡ Advanced ➡ Uncheck "Open Bluetooth Setup Assistant at startup if no mouse or trackpad is detected"
(These are for Monterey; Big Sur and Ventura may differ.)
You'll also need a display plugged into the Mac, or an HDMI dummy plug.
Taking screenshots of Find My using Shortcuts
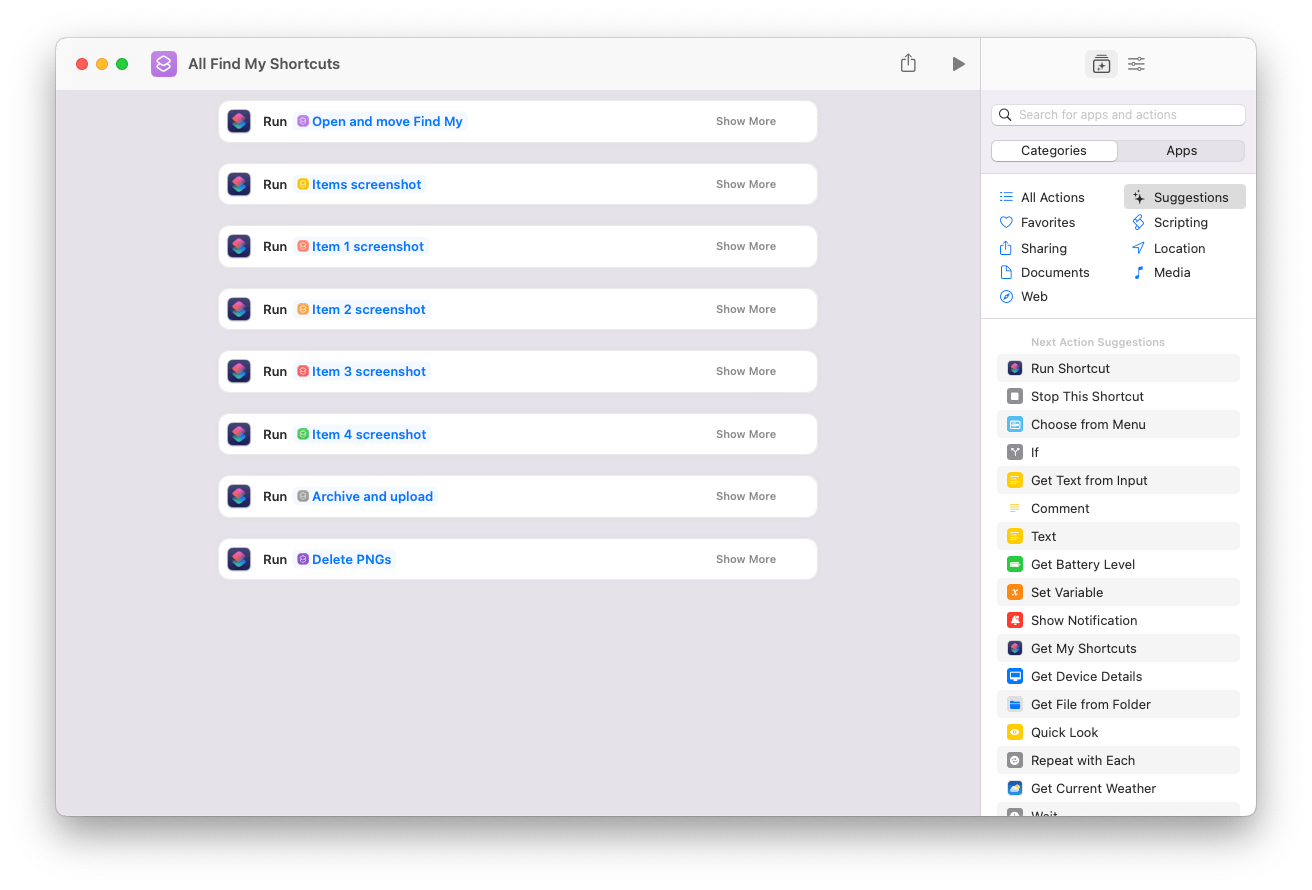
The Shortcuts editor seems very finicky with regards to long routines, duplicating items and moving them around, can't copy and paste, etc. Seems better to have single-action Shortcuts and then have one Shortcut that runs them all in order. This means I now have Shortcuts that:
- Launch, locate, resize, move the "Find My" window
- Locate the "Find My" window, change to the "Items" tab, take a screenshot, overlay the screenshot with the date and time, save it as a JPEG
- Locate the "Find My" window, click the first item, take a screenshot, overlay the screenshot with the date and time, save it as a JPEG
- Upload all the JPEGs to a web server
- Delete all the original screenshot PNGs
Plus, one Shortcut that runs them all sequentially.
Shortcuts won't let you run AppleScript or delete files without confirmation on each run by default, so in Shortcut preferences:
- Allow Running Scripts
- Allow Deleting Without Confirmation
The first run of a Shortcut requires monitoring. Every new folder access, file creation, or edit requires permission the first time, but "Allow Always" is an option.
Sharing Shortcuts requires an iCloud account, and since this is all on an iCloud account only for this purposes, and also since these Shortcuts include login credentials for a web server, I'm sharing them as screenshots instead.
Right-click and open the images in a new tab to see them full-size.
Shortcut-running Shortcut
Open the Find My application window and move it
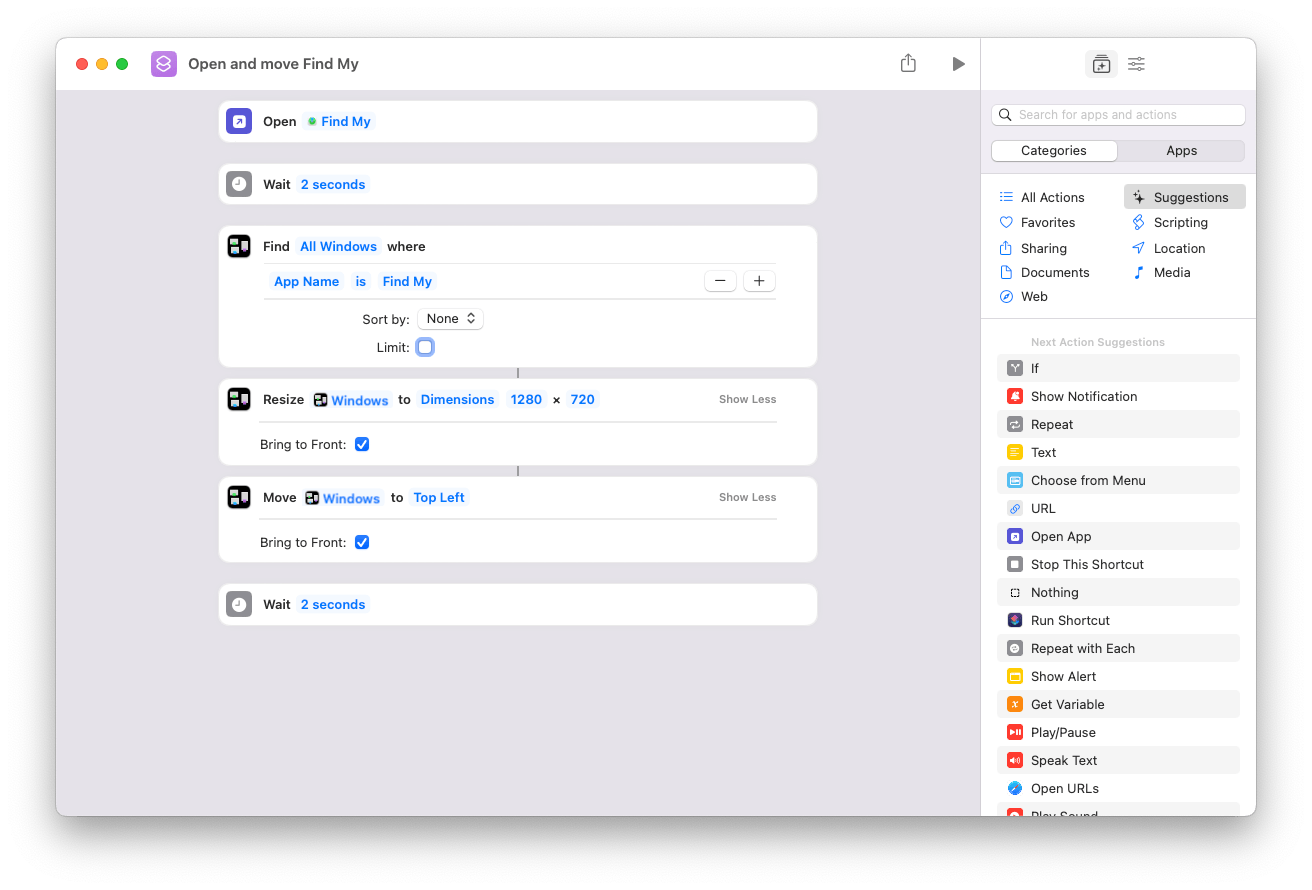
I move the Find My window to the top left to consistently compute the location of each Item to click on, since I couldn't seem to iterate through the window dynamically in a consistent way using Accessibility keystrokes.
Take a screenshot of the Items tab
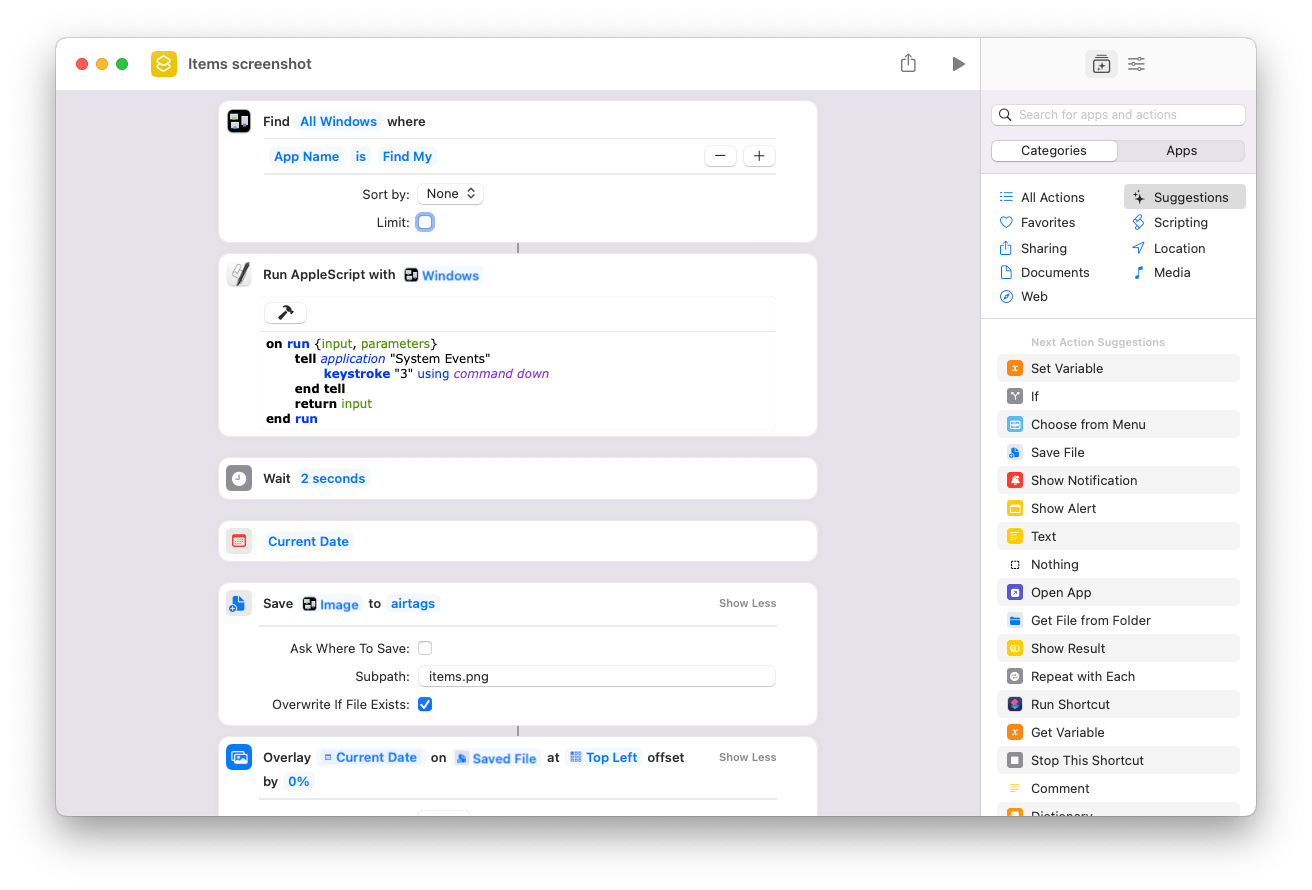
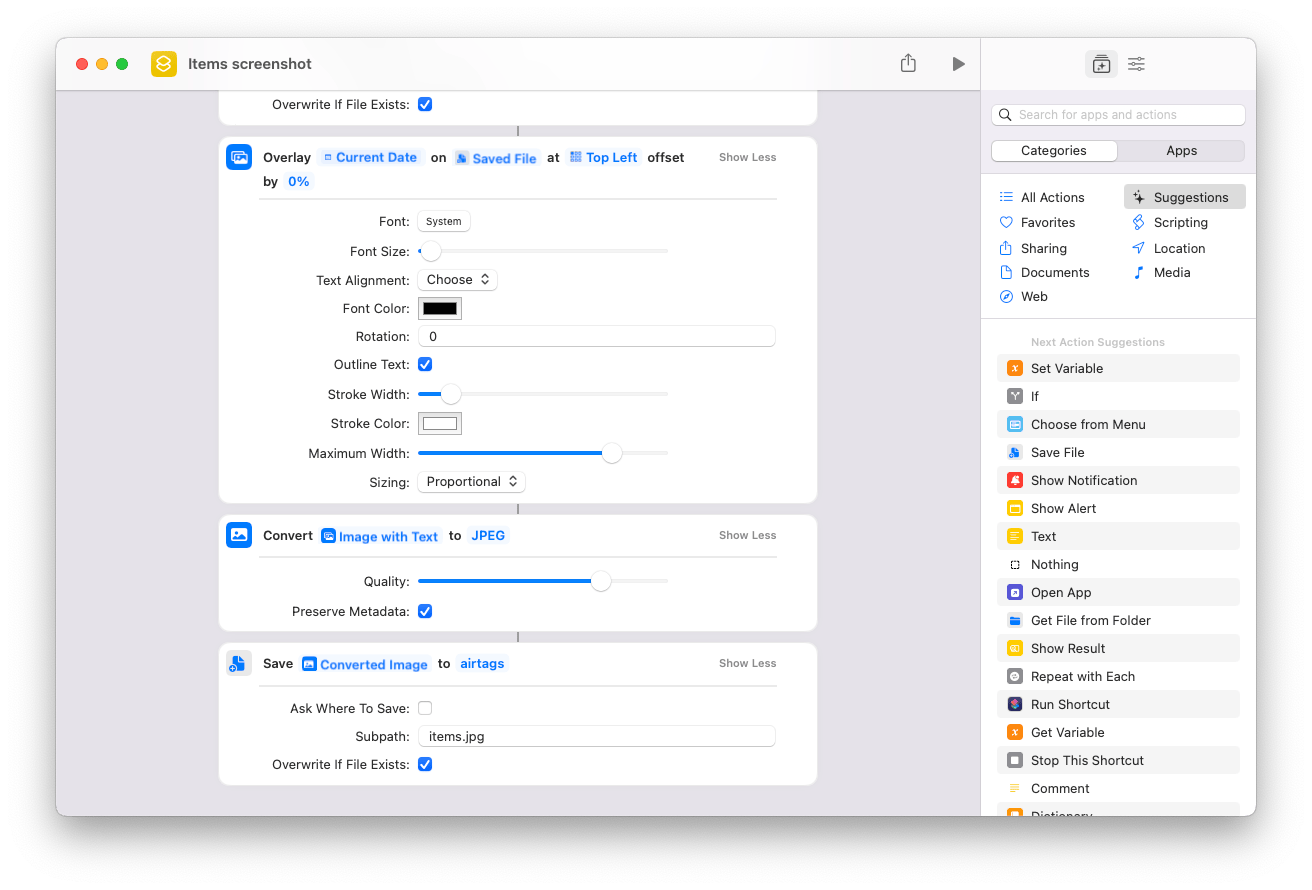
Here, we're using the Cmd-3 keyboard shortcut to switch to the Items tab. It's possible that the findmy://items URL that works on iOS would also do the same thing on macOS, but I haven't tried it.
Take a screenshot of an individual Item
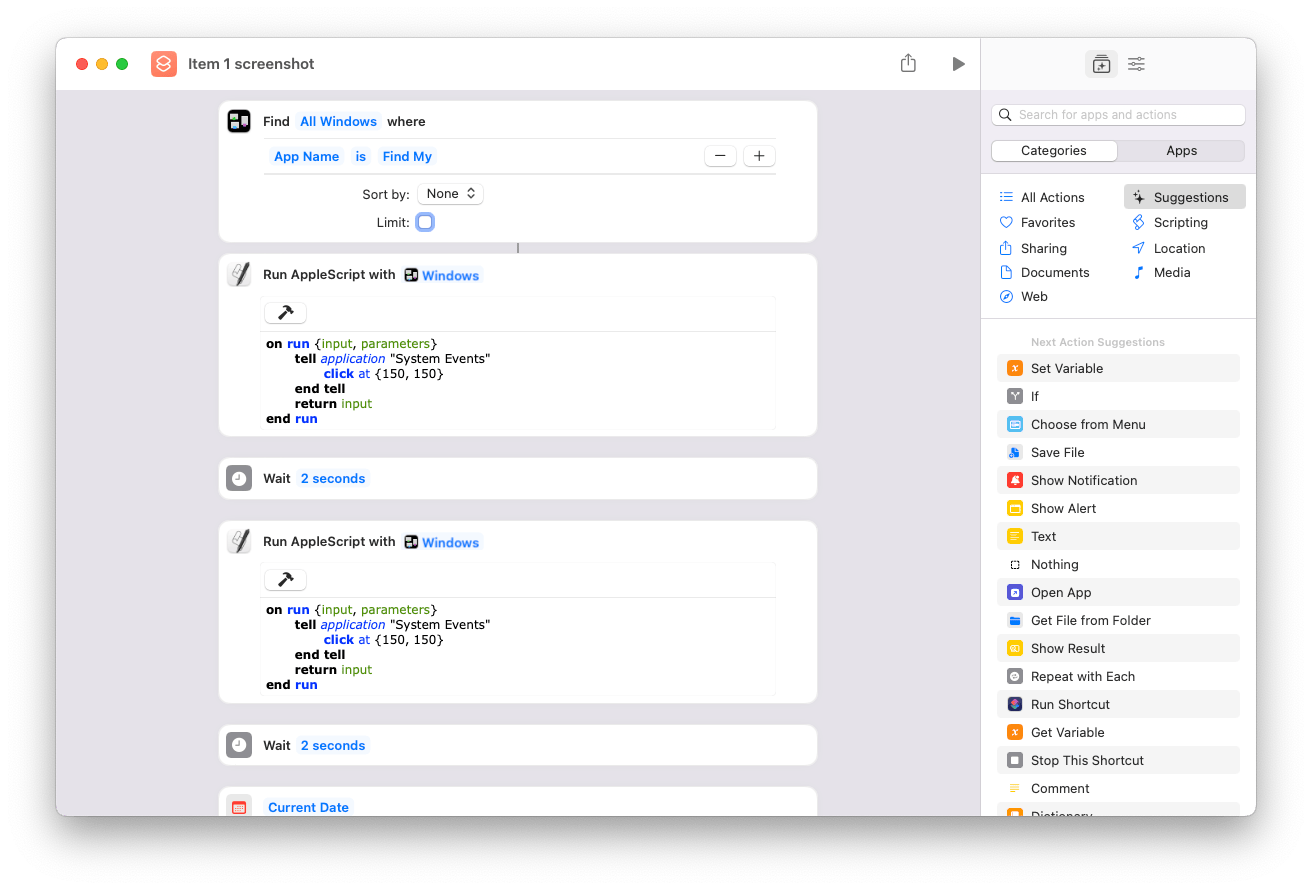
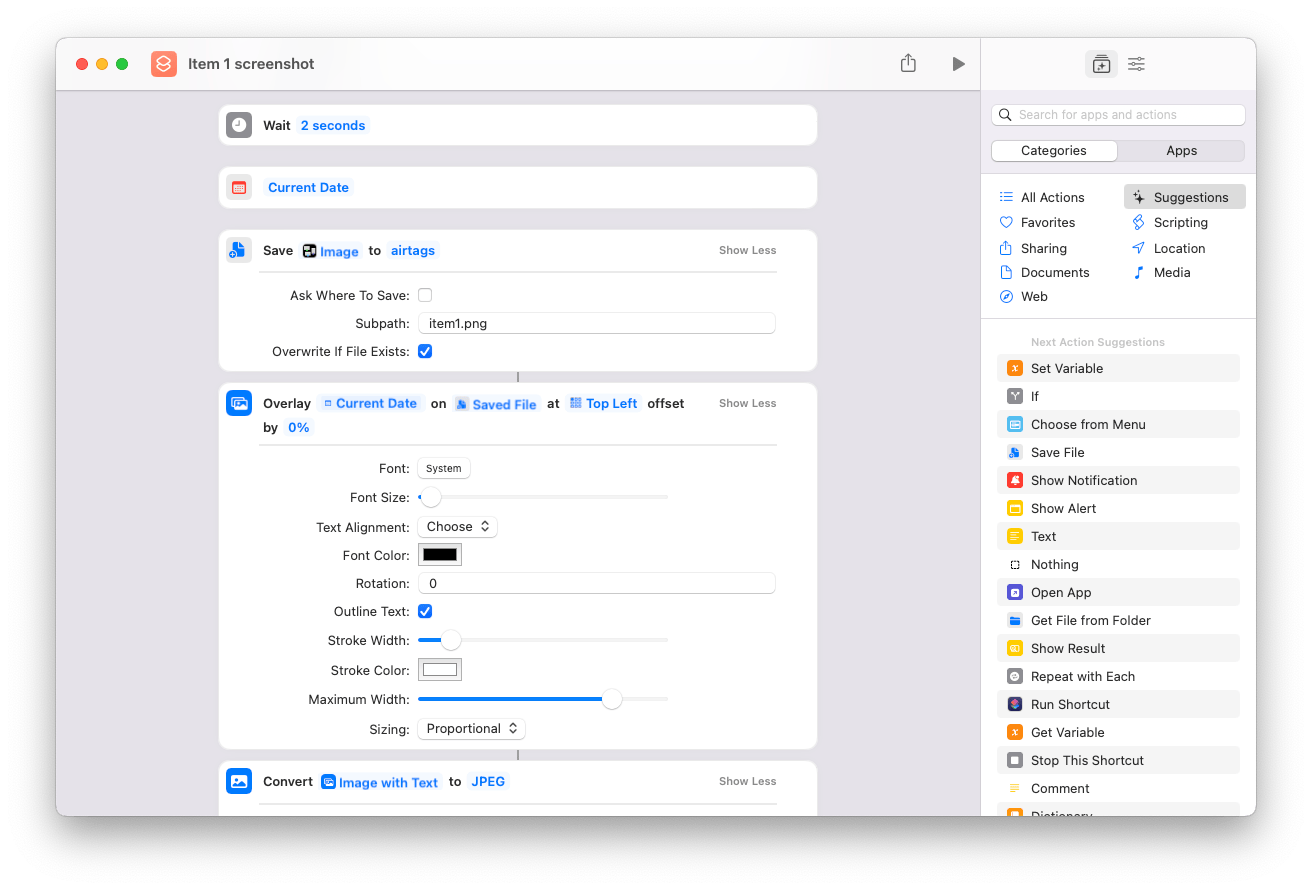
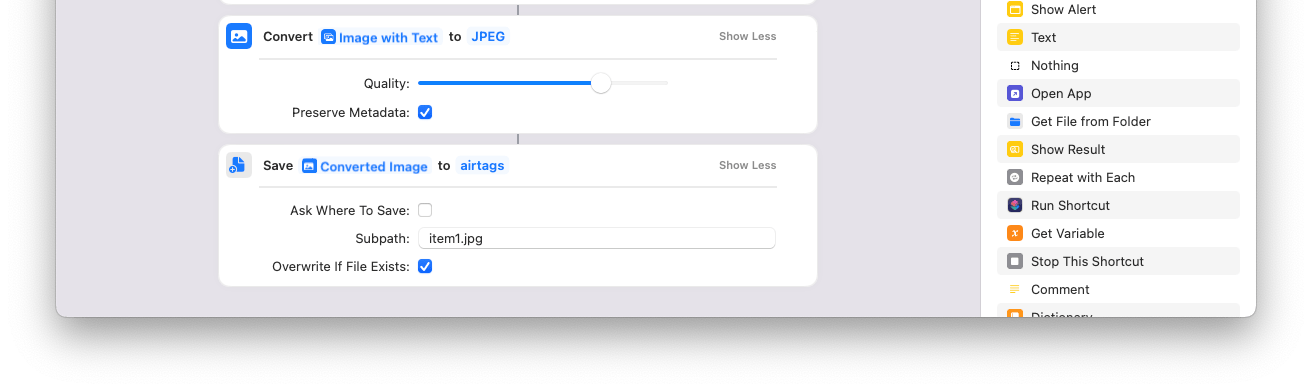
Here, we're using AppleScript to click at the coordinates 150, 150, which is roughly in the middle of the first Item in the Items tab. We do it twice, because in testing, sometimes one click didn't register. We save an image of the application, overlay the date and time (medium date, long time, to display time zone) with outlined text for readability, and finally convert to JPEG for mobile bandwidth concerns.
This Shortcut is duplicated three more times, with only the click coordinates and file names changing:
- Item 2:
150, 225,item2.png,item2.jpg - Item 3:
150, 290,item3.png,item3.jpg - Item 4:
150, 360,item4.png,item4.jpg
Upload the screenshots to a web site
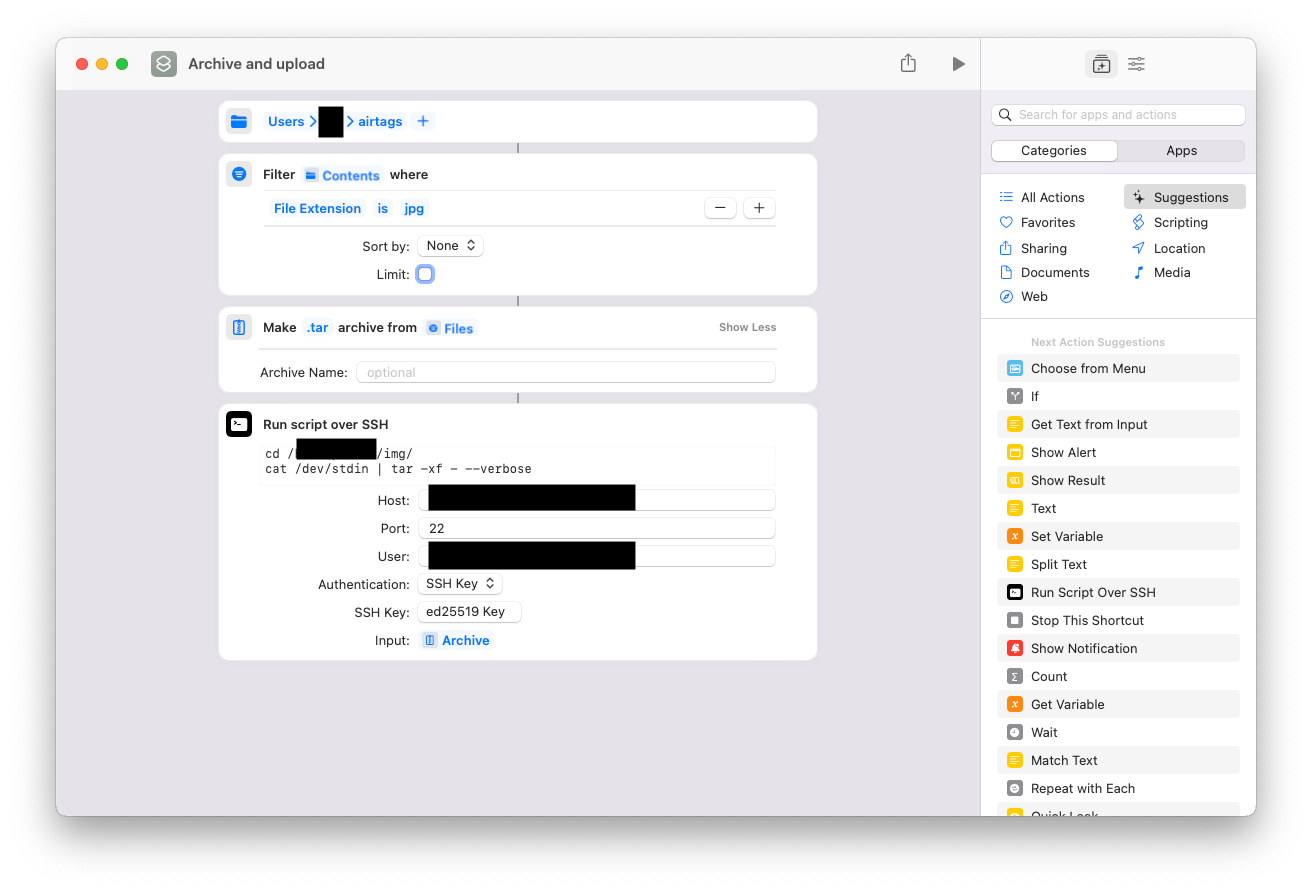
This trick, from this Reddit thread, archives all the JPEGs together and effectively pastes them onto the destination server, after instructing the server to receive and un-archive them in place.
With my particular web host, using a password to log into the server didn't work, and I needed to generate an SSH key.
I use a shared web host, but Shortcuts also offers other options, such as uploading to an Imgur or Cloudapp account, or saving it to a Photo Album that might sync with iCloud, or emailing it to yourself.
Delete the original PNG screenshots
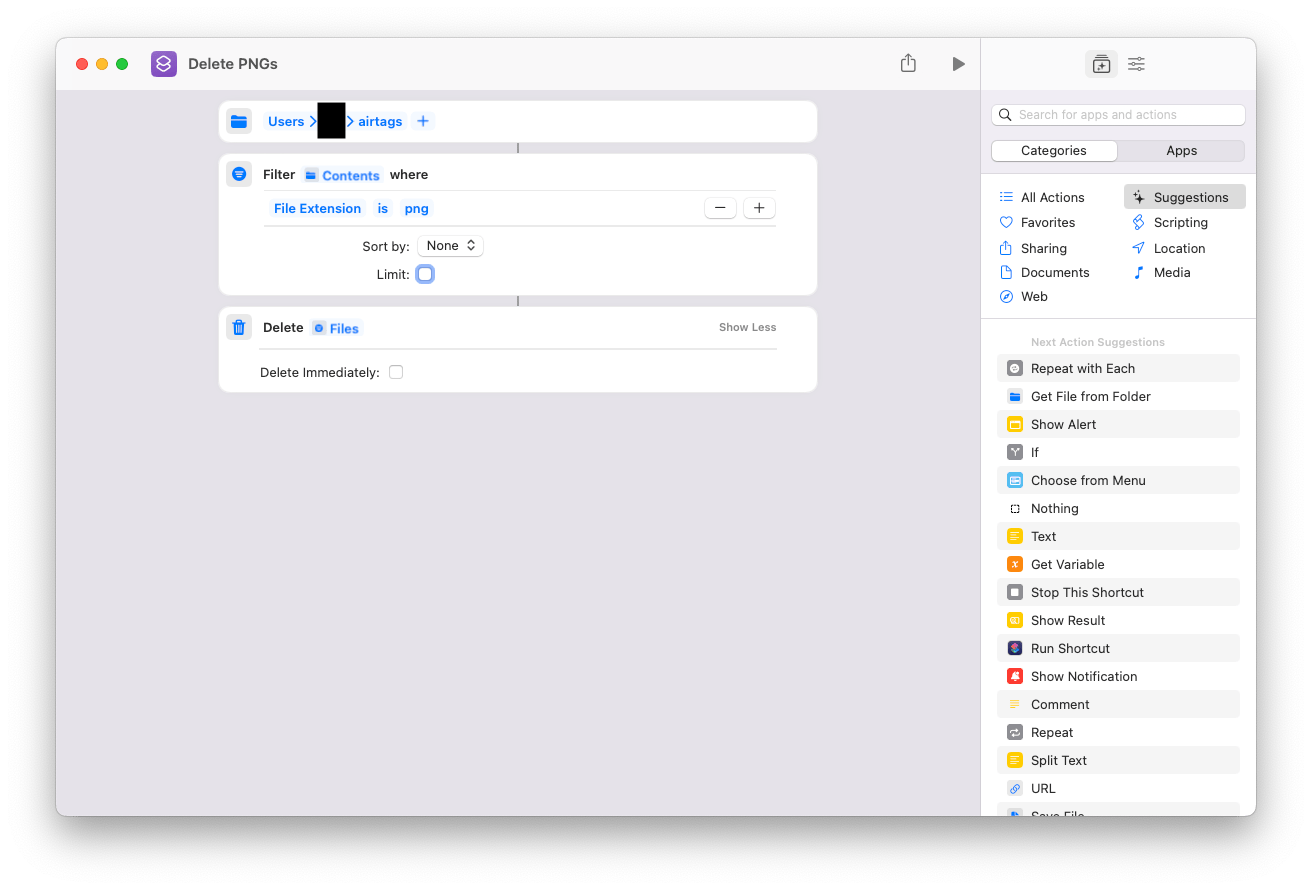
While the various Shortcuts are set to overwrite the screenshot files if present, it's nice to keep the machine tidy in general.
Triggering the Shortcut every 15 minutes
The right way to do this is apparently to make a property list XML file for launchd 💤
I used cron. From Terminal:
$ VISUAL=nano crontab -e
*/15 * * * * shortcuts run "All Find My Shortcuts"
Ctrl-O, Enter to save, Ctrl-X to exit.
The web site
Here's index.html, derived from HTML5 Boilerplate, with a favicon.ico and Apple touch icon of an AirTag sourced from Slackmojis:
<!doctype html>
<html class="no-js" lang="en">

<head>
  <meta charset="utf-8">
  <title>AirTags</title>
  <meta name="viewport" content="width=device-width, initial-scale=1">

  <link rel="manifest" href="site.webmanifest">
  <link rel="apple-touch-icon" href="apple-airtag.png">
  <!-- Place favicon.ico in the root directory -->

  <link rel="stylesheet" href="css/normalize.css">
  <link rel="stylesheet" href="css/main.css">

  <meta name="theme-color" content="#fafafa">

  <style>
      area { cursor: pointer; }
  </style>

  <script>
  function swap_ui() {
      document.querySelector('#ui').src = "img/" + event.target.dataset.ui + ".jpg?" + (new Date()).getTime();
      return false;
  };
  </script>
</head>

<body>
  <img src="img/items.jpg" id="ui" usemap="#findmy" class="items" width="1392" height="832" alt="Find My" title="Find My application screenshot">

  <map name="findmy">
      <area shape="rect" coords="245,90,338,112"
            onclick="swap_ui();" data-ui="items"
            alt="Items" title="View all items">
      <area shape="rect" coords="65,134,338,202"
            onclick="swap_ui();" data-ui="item1"
            alt="Item 1" title="Detail of item 1">
      <area shape="rect" coords="65,204,338,272"
            onclick="swap_ui();" data-ui="item2"
            alt="Item 2" title="Detail of item 2">
      <area shape="rect" coords="65,274,338,342"
            onclick="swap_ui();" data-ui="item3"
            alt="Item 3" title="Detail of item 3">
      <area shape="rect" coords="65,344,338,412"
            onclick="swap_ui();" data-ui="item4"
            alt="Item 4" title="Detail of item 4">
  </map>
</body>

</html>
That's it. That's the site.
The competition
Why have a dedicated Apple ID? Because your non-Apple ecosystem family members don't already have one, and because these iOS and macOS devices will become recipients for iMessages, FaceTimes, two-factor authentications, etc., if attached to your current Apple ID, all of which could be a security risk to a "real" Apple ID account, since the macOS device has to stay always on and unlocked.
Why not a secondary Apple ID as a user on an existing Mac? The Shortcut will run in the background while the user is switched, but the Find My map will not render correctly. If the Mac were to ever sleep, the screenshots would not get taken at all.
Shortcuts also run on iOS; in theory we should be able to make equivalent Shortcuts that run on the iOS device we bought, and not need the macOS device at all. However, at the time I started this, I knew how to automate a Mac, not an iOS device, so that's the route I went.
OpenHaystack lets you build your own AirTag-equivalent device and track it from an Android phone using the Find My network, but it still requires a macOS device always on and running to relay the data, so why not just use actual AirTags and the actual Find My app?
Extracting text from images is possible through Shortcuts, but it isn't extracted in a structured fashion, and I wasn't sure that'd be any more useful than a straight screenshot.
Third-party automation tools could do more structured extraction, at the expense of having to install and learn a third-party automation tool. That's starting to be more like real work.
Why not a remote desktop tool like VNC or Parsec? In bandwidth-constrained situations (like international travel without wifi) these might be unusable. Safely setting up a remote desktop login to an always-on Mac is a risk to a home network.
Why not a cloud-based Mac? AWS EC2 Mac instances are billed by the second with a 24-hour minimum, running between $16-$26/day depending on hardware and region. MacStadium starts at $132/mo. Scaleway has Macs for €2.64/day, but they're out of capacity. Mac Mini Vault has dedicated hardware starting at $29.99/mo. MacinCloud has Day Passes for $4/day with 5, 10, or 20 days/mo. minimum prepaid, or managed Mac servers starting at $22/wk. or $39/mo. for unlimited usage. HostMyApple has plans starting at $24.99/mo.
Why keep the Mac always-on? Using pmset to trigger a wakeup every 15m requires setting a schedule with a date and time for every event (96 events/day); repeat events can only be set once; relative events are relative to the time the machine goes to sleep and would therefore be inconsistent. Using external hardware to e.g. press a key to wake the Mac up requires extra hardware and starts to be more like work.
What about a virtualized Mac? Running a virtualized macOS apparently works in QEMU, but it's unusably slow unless you have hardware acceleration, which is only currently working under Linux. WHPX (Windows) support seems to be broken on and off.
Further notes on using just an iOS device
The iOS Find My app can't be deep-linked into an individual item, just the overall "Items" tab. The items themselves are buried in a card controller, which has to be swiped up (and potentially scrolled) to reveal them all.
iOS devices can't run AppleScript in Shortcuts, so the typical way of simulating touches is to turn on Voice Control and either loudly play a voice memo or other recording, or have text-to-speech read a command out loud.
Saying "swipe up card controller" twice will reveal the entire card controller.
The item names are the full contents of the row, which is rough to say and impossible to automate, and the item numbers depend on what else is on the map. Instead, "show grid with 9 rows" aligns the grid roughly with the item rows, and e.g. "tap 6" taps the first item.
"Swipe down card controller" hides the AirTag controls and leaves just the map and location.
"Tap close" doesn't seem to work to close the item, but "show grid with 9 rows" again, then "45" to bring up a detail, then "tap 2" will hit the close button. This returns to the Items tab, with the card controller partially opened.
If the application is in the middle of updating location, it doesn't seem to register the action, even if Voice Control's toast and overlay indicates it was heard.
"Take screenshot" takes a screenshot.
Voice Control doesn't seem 100% reliable, and there's no feedback if the application doesn't respond. I wonder if attaching a microphone or recording device input would be more reliable? There's no headphone jack on this model, but a Bluetooth headset is more reliable (but not flawless, it seems like overlays and popups confuse it, the Find My app isn't always the foreground).
This iPhone 7 is running iOS 15.7.1, which may be able to be jailbroken. A jailbroken device could be scripted on-device or through a remote desktop application (although then once again you have an always-on computer running).
VNC Server has recently become available in the App Store, although using the App Store on a device for this purpose means logging in with the Apple ID, and adding a name, address, and billing method. However, this might allow remote control and remote scripting (although that means still having an always-on computer, it just wouldn't have to be a Mac).
Irregularites when adding additional AirTags
Clicks started mis-clicking after adding in four additional AirTags, resulting in the new fifth item in the set being repeatedly displayed.
In searching for reasons, AppleScript-generated clicks seem to be unreliable at best, with external utilities being chosen when robust clicking is needed. I went with cliclick, available in both Homebrew and as a standalone utility. This changes the individual item screenshot's AppleScript to a single node of:
on run {input, parameters}
    do shell script "/Users/<username>/cliclick c:150,150 w:250 c:150,150"
end run
This still does two clicks, it just does them both using the utility. I now have eight (8) AirTags being tracked in this fashion. Item 5 is at 430, item 6 is at 500, item 7 is at 570 and item 8 is at 640.
I'm Vitorio, it's November 25, 2022, thanks for your time.
Updated November 27, 2022 with additional Shortcut and virtualization notes, and further iOS notes. Updated March 15, 2023 with changes for additional AirTags.